How to Add Multiple Photos to Instagram Story
Know how to add multiple photos to your Instagram Story, 4 simple ways from quick slideshows to full collages. Step-by-step guide for iPhone and Android.
Quick answer: Open the Stories camera, tap the gallery icon in the bottom-left corner and long-press any photo. This activates "Select Multiple" mode. Tap up to 10 photos in the order you want them to appear, then tap the arrow to post them as separate Story slides. For a single-frame collage instead, tap the Layout icon on the left side of the Stories camera to arrange multiple photos in a grid.
One story per photo sounds manageable until you return from a weekend trip with 30 shots worth sharing. Post them individually and you become the person who floods your followers' feeds. They will mute you. You would mute you.
Instagram gives you four distinct ways to share multiple photos in a single story session. Some turn each photo into its own slide. Others pack everything into one frame as a collage. Each method solves a different problem. This guide walks through all four, compares them honestly and covers the specs, troubleshooting and tips that every other guide leaves out.
Post Multiple Photos as Separate Story Slides
This is the default "multiple photos" method most people are looking for. Each photo you select becomes its own Story frame and your followers tap through them in sequence. Think of it as a slideshow you build in one step.
How to Do It on iPhone
-
Open Instagram. Swipe right from your home feed or tap your profile picture at the top of the screen to open the Stories camera.

-
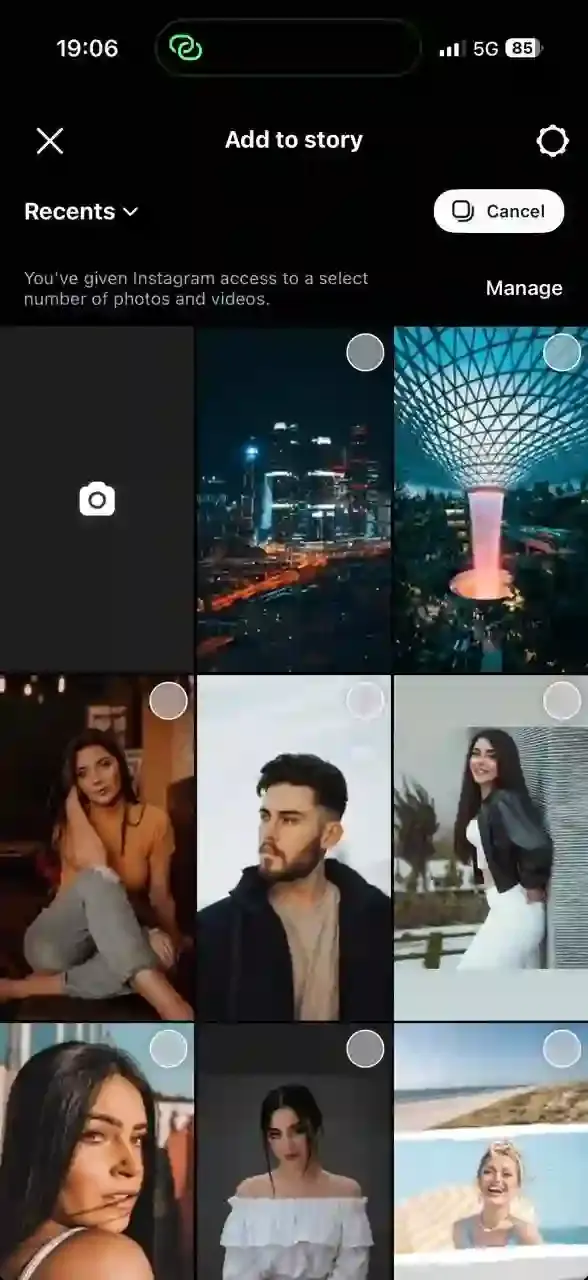
Tap the gallery icon in the bottom-left corner to open your camera roll.

-
Tap on the Select button which is on the right side of Recents. That activates "Select" mode, when Select mode is activated, Select button will turn into Cancel indicating that Select mode is active.
-
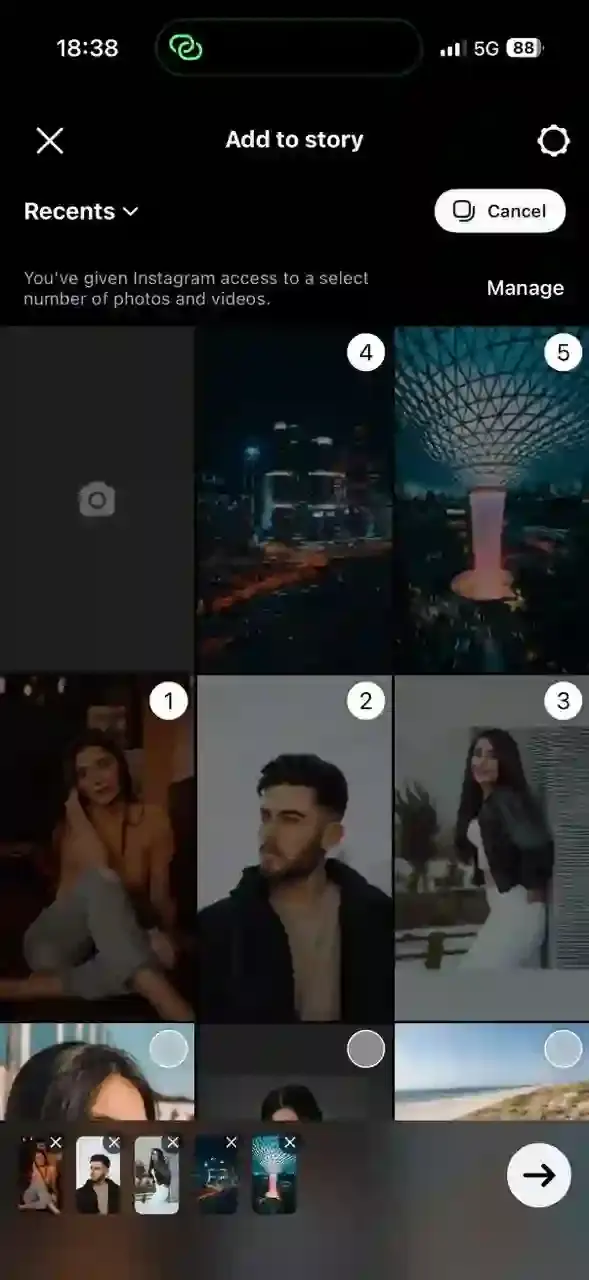
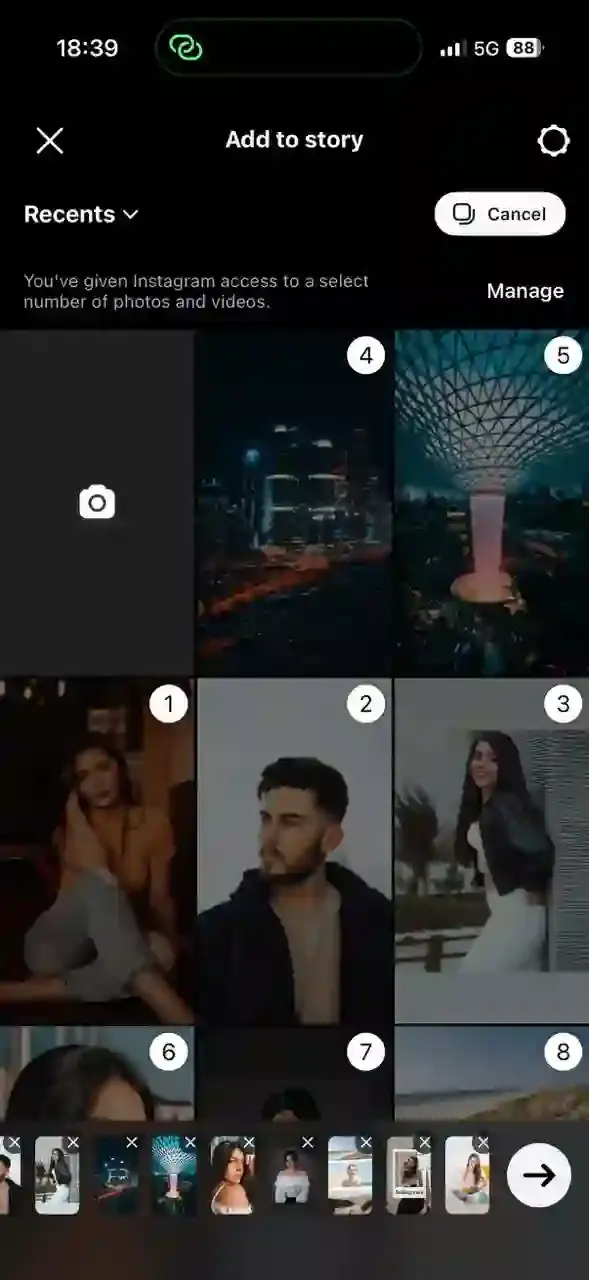
Tap each additional photo you want to include. Small numbered badges appears on the top right side of the selected images showing the exact posting order. Photo 1 posts first.
-
Maximum 10 photos can be selected at a time, tap the arrow at the bottom-right and finishing selection. You land on an editing screen for each slide individually.
-
Add text, stickers, music or filters to specific frames as needed, each slide can be customized separately. Tap on the arrow on the bottom right of the screen to see posting options.

-
Select Your story and tap on Share to publish all slides at once.

How to Do It on Android
The process is nearly identical. Open the Stories camera, tap the gallery icon and then long-press a photo to enter multi-select mode. On some Android versions, a small "Select Multiple" icon appears near the top-right of the gallery view instead of requiring a long-press. Select up to 10 photos, tap the arrow and edit individual slides before posting.
The 10-photo cap: Multi-select is limited to 10 photos per batch. If you have 25 photos from last night's dinner, post one group of 10, go back and post the next batch. Stories stack chronologically on your profile.
Order is locked in at selection: The numbered badges show posting order as you tap. Tap the photos in the exact sequence you want viewers to see them. If you make a mistake, deselect all and start the tapping sequence over. There is no drag-to-reorder option after you have made your selections.
Story duration: Each static photo displays for 7 seconds before auto-advancing to the next. A 10-photo batch gives roughly 70 seconds of content if a viewer watches without tapping forward. Tap-forward is extremely common on Stories. Put your strongest photo first.
Create a Grid Collage with Instagram's Layout Tool
The Layout tool fits multiple photos into one single Story frame arranged in a grid. No sliding, no sequence. Everything visible at once. It is the right choice when the grid structure itself communicates something: a before-and-after, three product colorways side by side or a "day in four photos" format.
Note: Instagram discontinued its standalone "Layout" app in May 2024. The Layout feature now lives inside the Instagram Stories camera. You no longer need a separate download for this.
Steps for Using the Layout Tool
We have a detailed visual walkthrough of this method with step-by-step screenshots in our Instagram story collage guide. The steps below cover the full process.
- Open the Stories camera (swipe right from the home feed).
- On the left panel of the camera screen, tap the Layout icon. It looks like a small divided rectangle.
- Tap the grid icon at the bottom of the screen to cycle through available grid patterns. Options range from 3 to 6 photos depending on the layout selected.
- Tap each empty slot in the grid. Use the image icon (bottom-left) to pull from your camera roll or take a live photo for each slot.
- Once every slot is filled, tap the arrow or checkmark to lock the layout in.
- Add text, stickers, music or other elements from the standard Stories toolbar.
- Tap Your Story to post.
What the Layout tool does well. Clean, symmetrical grids. No extra app required, works on both iPhone and Android and takes under a minute. The result looks intentional and balanced.
What it cannot do: Photos snap into fixed sections and cannot be moved, resized or overlapped. There is no spacing control, no individual filters per photo and no way to change the background behind the grid. If you need that level of control, the photo sticker method or CollagePhotoApp are better options.
Layer Photos Freely with Photo Stickers
Photo stickers turn each image into a moveable, resizable object you can place anywhere on the Story canvas. Overlapping arrangements, scattered layouts, fan-shaped stacks. The Layout tool gives you symmetry and the photo sticker method gives you creative freedom.
Instagram also introduced a dedicated Collage sticker that works similarly, letting you select multiple photos at once and arrange them in a flexible layout directly from the sticker tray. This feature is still rolling out to users gradually so not everyone sees it yet. If it appears in your sticker tray, use it. If not, the photo sticker steps below work for everyone regardless of app version or region.
Steps for Layering Photos with Stickers
- Open the Stories camera. Set your background by taking a photo, selecting one from your camera roll or picking a solid color using the draw tool with the color picker.
- Tap the Sticker icon at the top of the screen (the square with a folded corner).
- Scroll the sticker tray and tap Photo (labeled "Photo Sticker" on some app versions).
- Select a photo from your camera roll. It appears as a moveable layer on your canvas.
- Drag it to the position you want. Pinch with two fingers to resize it. Rotate with a two-finger twist.
- Repeat steps 2 to 5 for each additional photo you want to add.
- Layer in text, music, other stickers or drawings as needed.
- Tap Your Story to post.
A tip on backgrounds: A well-chosen background makes layered photos look like a composed piece rather than a dumped pile. A plain solid color, a blurred version of one of your photos or a textured image all work. Without any coherent backdrop, the result tends to look accidental even when it was not.
Make a Polished Collage with CollagePhotoApp
The three methods above are all built into Instagram. They are fast, free and get the job done. But each one comes with real constraints: fixed grids, no design templates, no font control, no individual image filters and no fine-tuned spacing. What you get is functional. What you get is not necessarily polished.
CollagePhotoApp is a free collage maker for iOS and Android designed specifically for this use case. Pick a 9:16 template built for Stories, swap in your photos, adjust the layout exactly how you want it, add styled text and export in HD. Then upload the finished image to Instagram Stories.
- On iPhone: Download from the App Store
- On Android: Download from the Google Play Store
The key difference is control. You decide the spacing between photos, the background color, the font, the filter applied to each image individually. Everything is on its own layer. The collage exports at full resolution. When you upload that to Instagram Stories it fills the screen crisp and designed.


If you are posting a Story for a brand, a product launch or an event you want to look back on without cringing, this is the method that earns the extra two minutes it takes.
You can also use the free Merge Images Online tool directly in your browser to combine photos side by side, vertically or in a grid and download the result before uploading to your Story. No app download needed.
For a deeper guide on Instagram-specific collage design, see our how to make an Instagram story collage guide. For making collages beyond just Stories, the how to make a collage on your phone guide covers the full range of options.
Which Method Should You Use?
Here is the honest comparison:
| Method | Best For | Photo Limit | Built Into Instagram? |
|---|---|---|---|
| Separate Slides | Trip recaps, event sequences, step-by-step tutorials | 10 per batch | Yes |
| Layout Tool | Clean grids, comparisons, side-by-side looks | 3 to 6 per frame | Yes |
| Photo Stickers | Freeform layering, creative scattered arrangements | No strict limit | Yes |
| CollagePhotoApp | Designed collages, brand content, HD export | No limit | Free separate app |
Use separate slides when each photo deserves its own moment and you want viewers to tap through a sequence. A travel diary. A recipe with distinct steps. An event with 8 highlights that each stand alone.
Use the Layout tool when the grid structure is part of the message. Four outfit options for a trip. A before-and-after comparison. Three product colors that need to sit next to each other.
Use photo stickers when you want a creative, organic-looking arrangement with overlapping or scattered photos. Good for mood boards, "day in my life" visual dumps and anything where perfect symmetry would feel stiff.
Use CollagePhotoApp when the Story represents something you actually care about looking good. The difference between a quick Layout grid and a designed collage with proper spacing, fonts and color coordination is visible to anyone who looks at your profile.
Instagram Story Photo Specs
Most people skip this section. Then their photos come out blurry or cropped wrong and they never figure out why. Here is the full specification list.
Dimensions: 1080 x 1920 pixels is the recommended size. Aspect ratio is 9:16. That is the full-screen vertical format used for Stories.
Minimum accepted size: 720 x 1280 pixels. Photos below this threshold will be stretched or look noticeably soft. Shoot and upload at 1080 x 1920 whenever possible.
Safe zone: Instagram's interface covers roughly the top and bottom 250 pixels of the screen with the profile area, sticker tray and reply bar. Keep important text and faces in the central portion of the frame to avoid being hidden behind UI elements.
File size: Up to 30 MB for images. Up to 4 GB for video files.
Supported formats: JPG and PNG for photos. HEIC files (default on iPhone) are accepted but converted. MP4 and MOV for video.
Display duration: Each static photo shows for 7 seconds before auto-advancing.
A note on iPhone HEIC files: Modern iPhones save photos in HEIC format by default. Instagram accepts HEIC but processes it during upload. For the cleanest result when doing collage work outside the app, export your photos as JPG first. Most photo editors and the Photos app on iPhone let you export as JPG directly.
Troubleshooting Common Problems
The "Select Multiple" Option Is Not Appearing
Close and fully restart Instagram. Make sure you are on the latest app version. On some older app versions, a small "Select Multiple" icon appears near the top-right corner of the gallery view instead of activating via long-press. Look for it there if the long-press method is not working.
Photos Posted in the Wrong Order
There is no reordering after selection. The numbered circles appear as you tap and show the exact posting sequence. Deselect all photos by tapping each one again to remove the badges, then re-tap them in the correct order.
Photos Look Blurry After Posting
This almost always means the source file was too low-resolution or was a screenshot. Screenshots capture at screen resolution (around 750 x 1334 on older iPhones, for example) rather than full camera resolution. Use the original camera file. If uploading from a collage app, export at 1080 x 1920 minimum before uploading.
The Layout Icon Is Not Showing in the Stories Camera
Update Instagram to the latest version via the App Store or Google Play. On older devices running significantly outdated OS versions, the Layout feature may not be available. The standalone Layout app was discontinued in May 2024 so there is no workaround via a separate download.
Photos Are Getting Cropped Unexpectedly
Instagram Stories use a 9:16 aspect ratio. Photos taken in standard phone camera ratio (4:3) will either show with pillarbox bars on the sides or get center-cropped. The Layout grid fills each slot as a square (1:1) by default. For full control over how photos are cropped, pre-crop your images to 9:16 before uploading or use CollagePhotoApp to set the canvas ratio before or at the time of composing your collage, adjust automatically and keeps everything leveled without the need to fix anything manually.
The Collage Sticker Is Missing From the Tray
The Collage sticker feature is rolling out to users in stages and not everyone has it yet. Use the standard Photo sticker method instead. It works identically for freeform multi-photo placement.
Save Your Stories to Highlights
Instagram Stories disappear after 24 hours. If you spent time building a well-composed multi-photo Story, that feels like a waste.
Story Highlights are the circles that sit permanently on your profile just below your bio. Add past Stories to a Highlight and they stay visible to anyone who visits your profile indefinitely, not just for 24 hours.
To add a Story to a Highlight while it is still live, open the Story and tap More (three dots) then tap Add to Highlight. To save Stories from your archive after the 24-hour window has passed, go to your profile, tap the + circle to create a new Highlight or tap an existing one and add archived Stories from there.
Organize your Highlights by theme, with clear names like "Recipes," "Travel," "Products" or "Behind the Scenes." A well-organized Highlights row functions as a permanent, scannable portfolio on your profile. Anyone landing on your page for the first time gets the full picture without waiting for you to post again.
FAQ
Can I add more than 10 photos to an Instagram Story at once? Not with a single selection. Multi-select is capped at 10 photos per batch. To share more than 10 photos in one session, post a first batch of up to 10 and then post a second batch. Your Stories appear in chronological order on your profile.
Does adding multiple photos post them all at once or one by one? With the "Select Multiple" method from the gallery, all selected photos publish simultaneously as separate slides in a single action. Viewers tap through them in sequence. With the Layout tool or photo stickers, everything appears as a single Story frame rather than a slideshow.
Can I mix videos and photos in the same multi-photo Story? Yes. The multi-select method accepts both photos and videos from your camera roll. Each piece of media becomes its own Story slide. Video slides play for up to 60 seconds each. Photo slides play for 7 seconds each.
Do Story slides post in the order I selected them? Yes. The numbered circles that appear as you tap photos show the exact posting order. Photo 1 posts and displays first.
Can I edit each slide separately before posting? Yes. After selecting multiple photos and tapping the arrow, you get an editing view for each slide individually. Add different text, different stickers and different music to each frame before publishing the whole batch.
Will my followers see all the slides or just the first one? All of them, in sequence. Each slide plays automatically for 7 seconds unless the viewer taps forward to skip. Most active viewers do tap forward. Put your strongest or most attention-grabbing content early, especially in the first two frames.
Does photo quality change when uploading multiple photos at once? Instagram compresses all uploaded media. The compression difference between single-photo and multi-photo uploads is minimal. The biggest factor in photo quality is the resolution of the original file. Upload original high-resolution photos rather than screenshots or compressed exports for the best result.
What is the difference between "separate slides" and a "collage"? Separate slides turn each photo into its own Story frame. Viewers tap through them one by one. A collage puts multiple photos into a single frame that shows all at once. Use slides when each photo deserves individual attention. Use a collage when you want to show multiple photos together as a single visual moment.
Start Sharing Multiple Photos Now
Four methods, one goal: sharing more than one photo without annoying your followers. The fastest option is multi-select from the gallery for separate slides. The cleanest single-frame option is the Layout tool. The most creative freeform approach is the photo sticker layering method. The best-looking result you can get without a professional designer is designing a proper collage in CollagePhotoApp and uploading it in HD.
Pick the method that fits what you are actually trying to say with the Story. Then go post it.
Ready to make stunning collages?
Download CollagePhotoApp